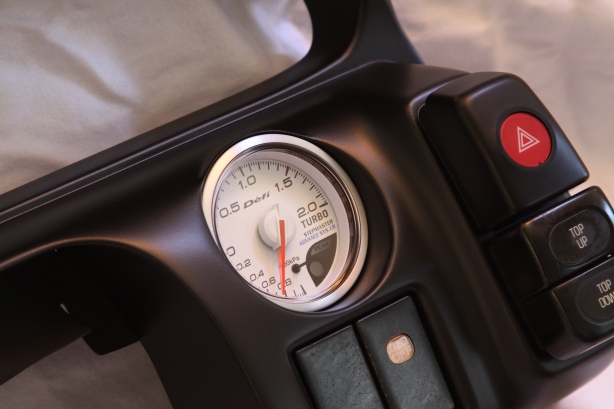
Finalized the work on a pretty challenging piece…. I would venture to say the most tedious work I have done with no margin for error. I removed the small vents that sit high on the shroud above the lower buttons on each side. That area is highly contoured, so I had to recess the gauges back in to clear the curve on the top edge. I first bonded in some 1/4″ thick ABS to fill the rectangular openings where the vents were. I sanded the ABS down to duplicate the OEM contour. I then filled the backside with Norton Speedgrip. I made a form on the backside and filled it about an inch deep. I then used a hole saw and made a precision opening just above the lower button openings. Anyone that has ever used a hole saw knows that the thing kind of wobbles around a little to make the hole. And as you can see in the pictures, I didn’t have much room for error above the lower button openings. Unfortunately the opening had to be big enough to flush a 52mm gauge in, which meant the contour at the top of the panel rounded over to fast and the hole saw opening had a weird cutout to it. So I molded in some visors on the top portion to take care of the issue. I think the final outcome looks very natural. Like most of my work, the final product looks simple, but the work involved to get said simple look is mind-boggling.
Customer’s S13 Cluster Shroud
Posted: June 11, 2013 in Custom Interior Fabrication, Toby Broadfield's WorkTags: Broadfield, Cluster Shroud, Defi, Plastic Fabrication, S13
Comments


Incredible work as always! Such tight tolerances, but it looks like it came that way from the factory
Thank you sir.
Awesome work!
Looks amazing!!
Would definitely consider this once I have a set of gauges that I’m set on!
Can you do this for me??? lol.
Of course.
How much do you charge for this?? Its sick
It’s probably best if you contact me through here:
http://www.broadfieldcustoms.com/home.html
We can then discuss in more detail.